on the whole i found the project very challenging, with must frustration when things went wrong. i found it very time consuming, with sometimes what felt like little reward.
if i was to do the project again, i would do the sphere part again, and this would hopefully resolve some of the problems i had later on, and allow me to continue with the project.
the face didn't turn out too badly, but i thought it could have be been. unfortunately time was not on my side, and i could only get so far with it. i would also have like to have made a proper neck.
Wednesday, 29 October 2008
final stages
there were two final things to add to the head to make it look more human. the first thing that was added was some eyes. these were made by making a sphere shape, and using the scaling tool, the shape of them was changed to fit in the eye slots. a eye picture was then put on them, using the material selector. a uv map modifier was then used to shrik the eye to the correct shape, and the gizmo to move it over to the correct position.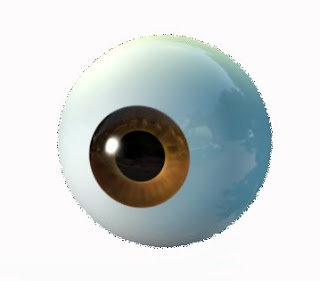 the final thing to do with the face was to add a skin material, this was done by selected a small area of skin on the photoshop picture and cropping it, and saving it as a jpeg picture. this was then added to the head by using the material selector and adding the material. using the uv modifier, the skin material was then transformed to more realistic shape. (i'm not sure if was the correct way of doing it, but this was done just to make it look more realistic).
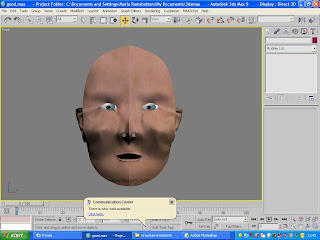
 the final thing to do with the face was to add a skin material, this was done by selected a small area of skin on the photoshop picture and cropping it, and saving it as a jpeg picture. this was then added to the head by using the material selector and adding the material. using the uv modifier, the skin material was then transformed to more realistic shape. (i'm not sure if was the correct way of doing it, but this was done just to make it look more realistic).
stage 7 - the ears
the ears were created in a very similar was to the front of the head.
1. lines were drawn on the photoshop picture to show the holes and ridges in the ears.
2. the photoshop picture was then re-loaded into the plane
3. the line tool was then used with the snaps, to create the basic shape of the ears.
4. one of the polys was then selected and transformed into an editable poly
5. it was then possible to attach the rest of the polys using the attach tool
6. once this was done the needed to start to take shape, so in the same way as before, the outide vertex were pulled to the side of the ear, and so on.
7. in the same way as before, the next line of vertex were pulled to slightly before the previous ones, and so one.
8. a basic shape was then formed of the ear, but the bumps and holes were not on the ears. using the poly selection (under edit poly), it was important to choose the polys that make up the hole in the ear.
9. choosing the chamfer tool under edit edges, this should then create a box around the polys. some of the boxs are a little messy and have triangles in them, so i used the collapse tool to get rid of these.
10. i then used the in insert poly tool, and pulled the polys back into the ear.
11. i also repeated the process for the hole at the top of the ear.
12. i then selected the edges of the ears, and using swift i pulled these done to creat the round shape of the ears.
13. i had to then creat some backs of the ears, and this was done by using the creat tool under the poly section (but only the tops and bottoms of the backs of the ears.
14. the final thing was to attach the ear to the back of the head. the ear was in the correct place. however as previously mentioned the symetry tool was missing, it was not possible to attach one ear and the computer automatically add the other. so i had to do it by eye, and use the attach tool to add the ears. for the right ear, a mirror tool had to be used to transform the ear, so it looked correct.
a few problems
at this stage a few problems occur which delayed me in progressing with the project further. once i had put the back of the head onto the front, i realised the lips had some how managed to get distorted, and needed to be mended. however, the amount of vertex had increased and this was impossible to correct. the only way i could correct it was to take the front off the back, and attach a back from a previous document.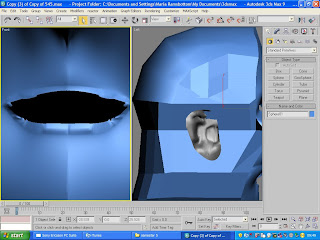
this picture demonstrates how far i had got before i realised the lips were wrong.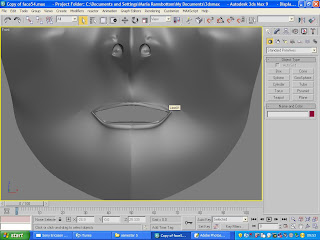 as you can see the lips are correct in this picture
as a consequence of not doing the sphere process again it did mess up the symmetry on the head, so it was no longer there, and that is one of the reasons why i could only get so far. if i had more time, i would have had to do the back of the head again, and this would have allowed to go further with the head.

this picture demonstrates how far i had got before i realised the lips were wrong.
 as you can see the lips are correct in this picture
as a consequence of not doing the sphere process again it did mess up the symmetry on the head, so it was no longer there, and that is one of the reasons why i could only get so far. if i had more time, i would have had to do the back of the head again, and this would have allowed to go further with the head.
stage six - the back of the head
After the front of the head was completely finished, it was important to make the back of the head. this was done in the following stages;
1. a sphere shape was created to roughly the correct size.
2. the scaling tool was selected, and the sides of the sphere were scaled to the shape of the head (bear in mind that the pictures of the head on the planes were visible)
3. the sphere was then rotated (in the left view port) so the circles that make up the sphere are clearly visible.
4. on the modifier panel, the edit poly modifier was then put on.
5. the next step was then to get rid of some of the sphere that is not needed. this is done by selecting the pain selection region tool and selecting all the polygons that are not needed. (the transparent tool may need to be switched on, so that it is possible to see the picture of the head). it was important to select the polygons that are below the tops of the ears, the middle circles and up to the top of the head.
6. the next step step was to drag out the polys to attach to the front of the head, and downwards.
7. once this is done, the weld tool was used to make sure all the vertex were together, and could easily be manipulated.
8. finally the using the attach tool it was important to make sure the back of the head was attached to the front.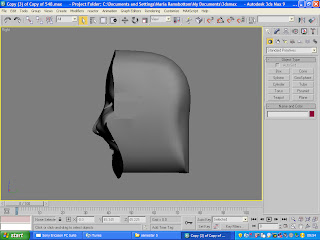
As you can see from the above picture, one of the things that went wrong with the head was the fact that a proper next was not created, so it looks a little strange. this was mostly because when i tried to do it, the shape didn't seem to go very well, and time was not on my side. so rather then waste a lot of time on that i decided to move on to the next thing, then it was difficult to go back and correct it.
1. a sphere shape was created to roughly the correct size.
2. the scaling tool was selected, and the sides of the sphere were scaled to the shape of the head (bear in mind that the pictures of the head on the planes were visible)
3. the sphere was then rotated (in the left view port) so the circles that make up the sphere are clearly visible.
4. on the modifier panel, the edit poly modifier was then put on.
5. the next step was then to get rid of some of the sphere that is not needed. this is done by selecting the pain selection region tool and selecting all the polygons that are not needed. (the transparent tool may need to be switched on, so that it is possible to see the picture of the head). it was important to select the polygons that are below the tops of the ears, the middle circles and up to the top of the head.
6. the next step step was to drag out the polys to attach to the front of the head, and downwards.
7. once this is done, the weld tool was used to make sure all the vertex were together, and could easily be manipulated.
8. finally the using the attach tool it was important to make sure the back of the head was attached to the front.

As you can see from the above picture, one of the things that went wrong with the head was the fact that a proper next was not created, so it looks a little strange. this was mostly because when i tried to do it, the shape didn't seem to go very well, and time was not on my side. so rather then waste a lot of time on that i decided to move on to the next thing, then it was difficult to go back and correct it.
Tuesday, 28 October 2008
stage five - features
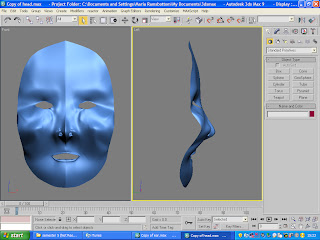
The next thing to do was to create some nostrils and lips. the lips was done by going on edit poly, selecting the edges and holding down swift i then dragged the lips out. the polygons were then selected and extruded. the vertex were then moved to the desired places to make them look more lip like. there were gaps in the lips, but this just required me moving the vertex's over to fill the gaps. various single vertex also had to be moved again to create the shape. the nostrils were made by using the create tool to make new polygons. once the polygons were made they were selected and pushed back into the head.
it is important to note that when the features were being added to the face the symmetry modifier was not on, so effectively only half the face was being manipulated.
stage four

the next step in the process was to pull all the points out to make the shape of the face. in the picture it is possible to see that the face has been put together complete. but before this step i had to start with the outside vertex and pull them out towards the edge of the face in the left view port. i then had to pull the next line of vertex out, and so on. i had to make a lot of adjustments by eye and as a consequence there are a few creases which shouldn't be there. the symmetrical modifier was then put on.
Monday, 13 October 2008
lesson two/three face
lesson two;
during lesson two i started to build the face picture up. we started to make sure all the lines of the face were correct. during this point i had to make quite a few alterations to the lines i originally made, as there were quite a few triangles on the face. these have to be alimented as they will cause problems when building the face into a 3d format.
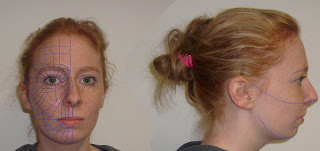 in the final part of the lesson i had to build two planes and add the pictures to them. so i selected the plane tool, added the picture by using the materials button or m on the keyboard. i then had to adjust the pictures, so uv transform button was selected under the modifications section. i then adjusted the size of the picture and using the gizmo button i could then move the picture (the front profile picture) so it was facing the front. i then had to make another plane and attach it to the side of the other, the gizmo was then selected and the picture was moved into the middle of the plane. (it was also necessary to adjust the size of the picture)
 lesson three;
i started to build up the lines in 3d max. this was done by making sure the "magnet" button was switched on, as well as choosing corner to corner on the line tab. this took quite a long time as i had to make sure there were no triangles in the 3d part.

during lesson two i started to build the face picture up. we started to make sure all the lines of the face were correct. during this point i had to make quite a few alterations to the lines i originally made, as there were quite a few triangles on the face. these have to be alimented as they will cause problems when building the face into a 3d format.
 in the final part of the lesson i had to build two planes and add the pictures to them. so i selected the plane tool, added the picture by using the materials button or m on the keyboard. i then had to adjust the pictures, so uv transform button was selected under the modifications section. i then adjusted the size of the picture and using the gizmo button i could then move the picture (the front profile picture) so it was facing the front. i then had to make another plane and attach it to the side of the other, the gizmo was then selected and the picture was moved into the middle of the plane. (it was also necessary to adjust the size of the picture)
 lesson three;
i started to build up the lines in 3d max. this was done by making sure the "magnet" button was switched on, as well as choosing corner to corner on the line tab. this took quite a long time as i had to make sure there were no triangles in the 3d part.

Wednesday, 8 October 2008
lesson two/three ymca
lesson two;
during this lesson we started to look as a group the way in which the ymca is run, and the activities they provide. this will then be used in the animation as a way of promoting the ymca as an orgainisation. we choose to focus on the whole of the ymca as apposed to a certain aspect of it. this is because we felt that teenagers (who are the target audience) would rather have an understanding of everything the ymca has to offer them.
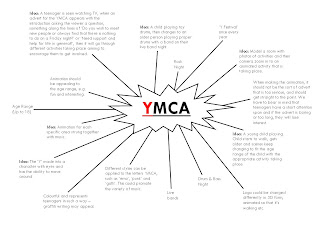
we then started to brainstorm the ideas as shown below. the idea that we decided to focus on however, was with a child that walks through different rooms. starting from a young age and progressively getting older.
lesson three;
we started to look at the chosen idea, and the way in which we can develop it into an animation sequence.
we decided however that the animation will be slightly changed during this lesson. we decided that we would change the character from being a 3d model to being in the form of a 2d shape that walk sand moves across the screen. we got this idea from looking at the ymca website (chelmsford), and on there they have a picture which is made up of silhouettes, which is what our character will look like in the animation.
there are four people in the team so we devided the 4 rooms between us, they are as follows:
during this lesson we started to look as a group the way in which the ymca is run, and the activities they provide. this will then be used in the animation as a way of promoting the ymca as an orgainisation. we choose to focus on the whole of the ymca as apposed to a certain aspect of it. this is because we felt that teenagers (who are the target audience) would rather have an understanding of everything the ymca has to offer them.
we then started to brainstorm the ideas as shown below. the idea that we decided to focus on however, was with a child that walks through different rooms. starting from a young age and progressively getting older.

lesson three;
we started to look at the chosen idea, and the way in which we can develop it into an animation sequence.
we decided however that the animation will be slightly changed during this lesson. we decided that we would change the character from being a 3d model to being in the form of a 2d shape that walk sand moves across the screen. we got this idea from looking at the ymca website (chelmsford), and on there they have a picture which is made up of silhouettes, which is what our character will look like in the animation.
there are four people in the team so we devided the 4 rooms between us, they are as follows:
1) Nursery - Lisa
2) Baddow Youth Club - Maria
3) Rock School - Luke
4) Y Club - Rich
Wednesday, 1 October 2008
ymca project ideas
a few ideas for the ymca project;
-a letter y that has eyes and the ability to move
-a letter/s that can play instruments
-but y is the star
- the letters could have different styles, goth, emo etc
-a letter y that has eyes and the ability to move
-a letter/s that can play instruments
-but y is the star
- the letters could have different styles, goth, emo etc
visit to the ymca
The visit to the ymca was very helpful, it allows us as a team to understand the way it works, and the type of advertising/promotion that is required for this organization.
they hold evening activities for all different aged children. these nights include; takeaway, band/live bands, fancy dress, casual, internet and chat nights.
they also hold breakfast and after school clubs. they have a nursery which takes 3 months to primary school.
the friday night club is a rock night. however it tends to attract alot of emo/goth people. this is something that they would like to get away from. they would the ymca to be seen as something that is available for everyone, but most importantly there is no particular group that is targeted to go these nights. this is the most popular evening, so the older age groups tends to go the ymca the most, although they would like more members.
they have annual events, and take the children to the park for sports during half term.
the way they currently promote the ymca is;
-by word of mouth
-my space/facebook
-send emails about the friday night (rock nights)
-primary school visits and send letters to parents
the less serious any new promotion is the better. this is because it is aimed as teenagers, and they do not tend to listen or pay any attention to serious things.
the icon for the ymca is a simple y, the ymca is also refered to as the y by many of it's members.
they have a lot of volunteers and part time staff so it is something hard for them to go into schools, and corrects the image tags that are associated with the nights they hold. when the children are 18 they are no longer allowed to attend the ymca as a memeber, however, they encourage them to volunteer instead so they are still involved.
Subscribe to:
Comments (Atom)